Saturday, June 19, 2010

Friday Night Sew-In - JUNGLE BABIES BABY QUILT II


Last night I joined in with many other crafting ladies doing a Friday night "sew in". I didn't decide what I was sewing until the last minute, but had been wanting to make another "Jungle Babies" baby quilt. I had most of the fabric needed already on hand and made a quick stop on the way home from work yesterday to pick up a little more of the Jungle Babies Fabric with the big animal faces.

My intent was to make a quilt top from start to finish and so I chose this simple pattern. As hard as I worked I couldn't finish it last night. So, as you can see in one of the pictures below, the morning sunshine was shining in on my work!

You can see the FIRST JUNGLE BABIES QUILT HERE that I made for my grandson, who is now almost three years old.

Here is my JUNGLE BABIES BABY QUILT II:


Finishing up early this morning:


Up close:


I had to laugh at myself when I realized this quilt is a just a really big 9 patch! It definitely is turning out to be my summer of the 9 patch quilt challenge!


9 patch squares are one of the easiest patterns to use when using the leaders and enders system, so as a result, I also made four more 9 patches for my summer 9 patch quilt. It is going to be made totally from scraps. I am digging through all my bins and containers of scraps to find some very interesting combinations.


I loved doing the Friday Night Sew In! It gave me the incentive to really get something done. I plan to finish quilting and binding this quilt as soon as possible and then it will go into my Etsy Shop. I am often in need of a baby gift and my theory is that if the quilts in my Etsy Shop don't sell, I can always pull one out for a baby gift as needed.

Have a great QUILTY day!

Friday, June 18, 2010

I love Scraps!


Its hard to throw away even the smallest scraps like these in my sewing room trash can!

Here are more 9 patches for the Summer of 2010 9 patch challenge. I've made 25 and its the 18th of June, so I am ahead of the game!

Reds and blues:


Lavender and purple:


Golds and greens:


Blacks and reds:


Doing different color combinations like this gives me ideas for future quilts color schemes!

I still haven't made up my mind what sewing project I'll work on tonight at the Friday Night Sew in! I have so many things I could work on. I will have to make up my mind today. Tomorrow I will post the results!

Sunday, June 13, 2010

Thomas the Train Quilted Travel Play Mat Tutorial

Time spent on an afternoon project was a joy... seeing my grandson play with the project... priceless!


My inspiration for making my grandson this neat Thomas the Train Quilted Travel Play Mat came from some tutorials I have seen that used fabric featuring cars, trucks and streets. Since my grandson loves Thomas the Train and this Thomas the Train fabric is the only one my local fabric store carries that would work, I decided to switch from cars to trains. And since I am a quilter at heart, I put a quilty twist on it. It has pockets for the trains and folds up to fit into his Mom's purse.

Here's how I made it.

I bought 1/2 yard of the Thomas the Train fabric. I trimmed off the selvage and evened up the edges. I then cut the fabric into two pieces on the fold so that there were two rectangles 18 inches by 22 inches. I had plenty of scraps and other fabric in my stash to make the pockets and binding, as well as lots of leftover quilt batting scraps. This is just like making a mini quilt. The play mat I made has the same fabric on both sides and the child can use either side for pretending to drive his trains.


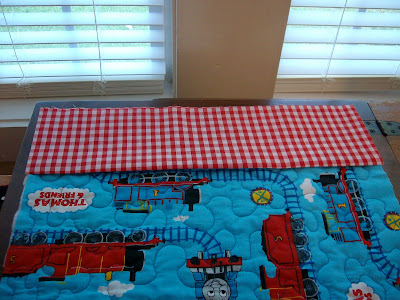
I taped down the edges of one piece of the fabric, face down, before layering the mini quilt sandwich.


On top of the taped down rectangle, I layered the quilt batting and the other rectangle face up and then pin basted it.


Then I free motion quilted the quilt sandwich in a meander design.


This is what it looked like after being quilted:


For making the pockets for the trains, I used two pieces of coordinating fabric 18 inches wide and 10 inches long. I folded both pieces in half lengthwise which made the pockets a double thickness and about 5 inches deep. I pressed it well and pinned the raw edges on one end of the quilt. When the binding was sewn on the quilt the edges of this fabric were sewn down right along with the binding.


I then sewed on the binding. For instructions on this, see my quilt binding tutorial HERE.


After the binding was finished, it was time to sew the seams to create the pockets. I laid the toy trains on top of the fabric to see what size I needed. The little trains I bought to go with the mat are about the size of a matchbox car, maybe just a little bigger, and the pockets needed to be about 3 inches wide.


The finished play mat front:


Back:


After placing the trains in the pockets, I folded the play mat up from the bottom in 4 inch or so sections and added two small velcro squares to help secure the play mat. Then I folded that in half. I think if I make another one I will omit the velcro, since the play mat folded up and stored in my daughter's purse just fine without it.


This would work for lots of different ideas for kids. I'm thinking of a princess theme for a little girl with pockets for her small dolls. Also an army theme for a boy with pockets for the toy soldiers and tanks. How about a farm theme one with pockets for the tractors?

Another good thing about this project is that the child can take the small quilt to bed with them and use it as a cuddle quilt, without the toys.

Thursday, June 10, 2010

The Summer 9 patches are growing...

9 patches are so fast to go together! I started a week late on the one a day 9 patch summer challenge, but I'm already almost caught up.

Eight are complete:


Two are cut out and ready to put together tonight:


Today is June 10th, so since I will have 10 blocks done today, I'm caught up! Doing one square a day from here on out shouldn't be a problem. If I miss a day I can just do 2 the next day.

My 9 patch squares are 6 1/2 inches, since I am using 2 1/2 inch small squares and strips to make them. I realized after I got started that I have this 6 1/2 inch Easy Square. After finishing pressing each square I use the Easy Square to check for accuracy.


I'm also making progress on another quilt. This one uses 5 inch squares arranged in a light/dark sequence. The outer portion of the quilt will have darker squares than the inner part of the quilt. I am stacking up the squares in the order they need to be in for one row and any time I get to the end of a line of stitching, I stick a row of this under the needle and sew another square on to a row. I love to make two quilts at one time and it saves so much thread!


Tuesday, June 8, 2010

The Summer of 2010 Nine Patch Challenge


I have been wanting to participate in a quilt along for a while and have been quite tempted by several that I have seen on some blogs. I was getting so excited about them and then I realized that I would probably not have time to do a very complicated quilt.

Also, the fact that I already have some quilts in progress helped me decide that I'd better do something simple. And I really wanted to use fabric that I already have, especially some of the scrap soup that I have accumulated.

So when I saw this quilt along on Karen's Quilts, I knew it was the one for me!

The way it works is that you make one nine patch quilt square every day. The quilt along started June 1st, so I am a little behind, but the blocks are so easy and quick to make I will be able to catch up in no time.

The above picture shows two blocks that I made last night and two more that I cut out that are ready to be sewn together. I am going to use my 9 patch blocks to make a quilt like this one at Crazy Mom Quilts. I really love all the quilts at Crazy Mom Quilts!

The blocks for this quilt can be any colors, as the white sashing and scrappy border will tie everything together. So I am going through my scrap bins and 2 1/2 inch strip bins to put together combinations that are pleasing to me. Coming up with these blocks using my favorite scraps is fun.

The only rule I have for this quilting project is that the fabrics look cute together within each block. Each finished block will be 6 1/2 inches square. Since every block is different, strip piecing isn't really an option. I have SO many scraps that I doubt this project will even make a dent into them!

Monday, June 7, 2010

Friday Night Sew In


OK, I've always loved Friday nights. After a long work week, it is a night to let my hair down, put on the lounging wear (aka pjs, sweats, etc.) and anticipate the two day weekend coming up.

I've seen The Friday Night Sew In on blogs in the past and was intrigued, so I'm joining in for June. The date is June 18th, so there's plenty of time to plan.

Go to CRAFTY VEGAS MOM to sign up and read the "how to" of this fun night of sewing! Normally, Heidi of HANDMADE BY HEIDI hosts this, but she is making a big move from Arizona to Minnesota, so Bobbi of Crafty Vegas Mom is hosting it for June.

Hope you'll join all of us blogger/sewing ladies for a fun night of sewing together.

Thursday, June 3, 2010

Little Boy Blue

Thanks to the long Memorial Day Weekend here is a FINISH! This quilt is one of two that I have worked on for quite a while using the leaders and enders system that I learned at Quiltville. This week I am working on the other one which is identical, except for the borders, and have made quite a bit of progress.


This is a first for me in a couple of ways. One, I washed and dried the quilt before giving it away, which gives it that crinkly quilt feel and secondly, I have listed it in my Etsy Shop. Too bad I don't know anyone who is expecting twin boys, since I will have the second one finished soon.


I am enjoying using my cordless steam iron. I can't believe how much better the quilt squares turn out using steam. I am also striving to have more accurate piecing with an end product that lays FLAT. Paying more attention to how the seams are pressed so that they butt up to each other is making a big difference. I often wondered how the quilters whose quilts were featured in quilting books or some quilting blogs achieved such flat quilt squares. Now I can say that my quilt squares are ending up flat too.


Here's a rocking chair and a little boy's quilt. All we need is a baby boy!